Circle Sacred Site
by John "Scarab" Salmond
by John "Scarab" Salmond

This tutorial started in June 2006 as a Work In Progress (WIP) on the Privateer Press forums. This was an idea that came from the thought of adding more ground to a board without taking ground from the board. This is a piece of ground that is sacred to the Circle and had to be relocated because civilization was encroaching on it. It had to be moved to a safer location. Anyway, let us start in on making the piece.
Materials Needed:
Whiteglue
1/2" dowel
Screws
Large washers
Foam
1/4" masonite
Toilet paper
Celluclay
Picture wire
Rocks
Tree roots
Clumped foliage
Static grass
Joint compound
Whiteglue
1/2" dowel
Screws
Large washers
Foam
1/4" masonite
Toilet paper
Celluclay
Picture wire
Rocks
Tree roots
Clumped foliage
Static grass
Joint compound
The Basic Form
I started by cutting out a piece of foam core poster board in a circular shape. I used a 1/2" dowel for the center support piece. I predrilled holes in the dowel so the screws wouldn't split the dowel when it came time to put a screw in it. I cut some scrap foam I used a screw and large washer on the top side of the foam core with the dowel on the other side and attached them together. I then glued the foam to the foam core board and the dowel with whiteglue. I wanted the dowel to support the structure so it had to be screwed in between the top and the bottom.
I started by cutting out a piece of foam core poster board in a circular shape. I used a 1/2" dowel for the center support piece. I predrilled holes in the dowel so the screws wouldn't split the dowel when it came time to put a screw in it. I cut some scrap foam I used a screw and large washer on the top side of the foam core with the dowel on the other side and attached them together. I then glued the foam to the foam core board and the dowel with whiteglue. I wanted the dowel to support the structure so it had to be screwed in between the top and the bottom.


I then cut a piece of masonite and beveled the edges to make my base. I attached it to the dowel with a screw and washer for support. Once I did this I used joint compound mud to slap on the foam and the top surface. When the mud was dry I took toilet paper dipped in watered down whiteglue and applied that around the edge. Once that was applied I took my craft knife and shaped it to look like it was hanging earth.

I made three foam centerpieces for the sacred stones. I put joint compound on them as well as I could carve the runes in them. Once they were dry I carved and sanded them so they could be attached.

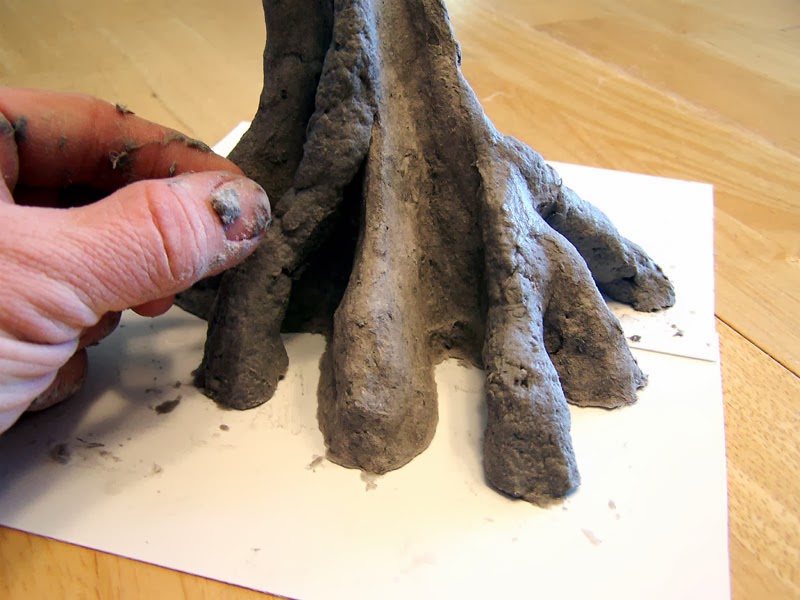
When doing a tree I start by creating the main structure of the tree. I would use Celluclay (paper mache) for this. Sometimes I place a rock on first so could have the roots over top of the rock.

Shape your tree after you have the main structure finished. Smooth the surface of the tree by wetting your fingers and rubbing the Celluclay to make it smooth. After every application I always put the tree in front of a fan to speed the drying process up. I can do the next step within a half hour at this stage when doing that. It won't be completely dry but dry enough to work with if I am careful.


Remember to add webbing in some case to the top of the tree if that is the style you are working on. This ties everything in. Remember that Nature does not like straight lines and exact patterns. Keep things the same but different if the makes sense.

The next step is to add more roots so you have depth to your tree. The Sacred Earth piece was just a one-layer root system. You will notice that I have done this tree on sheet styrene because the Celluclay doesn't stick to it.


Once you have finished the large root system use real roots from trees or plants to add the detail that small roots provide. The Sacred Earth piece does to have the extra roots added.

For a rough bark look wait until the main tree is done and then apply a fine layer of paper mache to the tree and work it with a knife to give it a bark look.
Wait until you are almost finished to apply the picture wire (already pulled apart and shaped). I added paper mache over the top of the wire for support. I have found using picture wire is the best for holding foliage but it is also time consuming to pull apart with a craft knife.


I then glued the stones on and added paper mache to the dirt underneath with real small rocks and as well as a few large ones mixed in. I also did the same to the top. On the top I made sure that I smoothed out the paper mache.


The Details
I painted the earth with a medium brown with a dark brown wash over the top. I then drybrushed it with a lighter brown. I did the same to the dirt below. I then painted each rock dark gray and drybrushed with a lighter gray. I applied clumped foliage to the tree and some hanging roots that I had.
I painted the earth with a medium brown with a dark brown wash over the top. I then drybrushed it with a lighter brown. I did the same to the dirt below. I then painted each rock dark gray and drybrushed with a lighter gray. I applied clumped foliage to the tree and some hanging roots that I had.


The Circle logo in the middle was carved out of the mud and then painted light yellow. I used a light green wash and then went back and used the yellow to drybrush the middle of the logo to help it look like it was glowing. I also drybrushed the light green on the stones to add to the glowing effect. The stones were painted with a medium gray ad washed with a very dark gray. I drybrushed them with different light grays before the green highlight was added.


Another option is to make some smaller floating pieces for added effect. the step was made by putting a very thick gauge wire through the foam pieces before applying the mud.


When I did the grasses and finish work I wanted the top and bottom to be very different to show that they were not from the same place. I also used real roots and randomly applied them to the earth to give the impression that the earth was ripped from the ground. I added more roots around the tree.


If you have any questions feel free to contact me at thegeekgarage@gmail.com. this was a fun piece and I added the other style of tree into this tutorial that I created doing the Trollkin Village tutorial. The focus of this piece is the tree so I wanted to keep the tree tutorial in this work. This is one of my favorite pieces that I have created. Hope you enjoy.
Later,
John 'Scarab7664' Salmond