Showing posts with label Rackham. Show all posts

Sunday, September 22, 2013

Piper of Tir-Na-Bor

Finished up this tiny little bugger a little while back. I really, really enjoy painting them a lot! This one is an older fig in the Rackham line, so is a little more static, but I love how cartooney the faces were back then!
I threw in a group shot since I had rounded these guys out to a solid little force of five. Thanks for looking. Scotty-


Monday, June 10, 2013

Grims Mini Swap WIP

So I have been spending a whole lot of time playing Warmahordes and doing modifications or conversions on my Trollbloods army.  So my painting time has suffered a bit.  However I did get a bit of time this last little bit to work on this little dude for Scotty.  A classic Warrior of the Abyss from the Mid Nor of Confrontation.


These Rackham figures are so freaking great!  The detail and character in everyone of their miniatures is so awesome! They are my goto cure for painters block, because they are so damn fun to paint!

Here are a couple of WIPs. 


Scotty has a rockin' Purple and dead flesh Mid Nor crew.  So I decided I'd do my own little spin on his color scheme.  Hopefully I can do his crew justice.

Short and sweet this time folks.  Any questions or comments, advice, criticism, cookie recipies...
Please throw them in the comments.

Thanks for watching!!

-Grim

Sunday, January 20, 2013

An Apology and Some WIPs

Alright, the Holidays have come and gone, and it has been nearly a month since I have posted anything up here on the GG...

I have to apologize... I always seem to think that during the holidays I will have more time for hobbies, yet every year it seems I have a whole lot less free time than I imagined.  So again, I am sorry for my slacking.

Now, here are a few WIPs I have been working on over the holidays.

First Up....

Tir Na Bor Standard Bearer:


Now, I know you want to see what else Im working on right? :) :P
Click it!! Come on!  Please? Click it!!

The next guy I have been working on is another one of my favorites from Rackham...

Magnus the Mystical:


Ill show you this guy from the very beginning.  Cleaned up and primed white.


Added some basecoats... You may have noticed something is missing...

I dare you to comment and point it out.  I double dog dare you!!


At this point I couldn't figure out what to do with his gloves.  I chatted with my buddy Scotty and he suggested doing some crazy red and blue transitions.

This is how it turned out...
Thoughts? Comments?...
Verbal Abuse?


I decided to move the transitions over to his sword as well.  Like this Mystical magician was doing some crazy magic voodoo on his sword.

Not sure if the effect came out exactly as I had pictured... but I think I like it.


I did a little bit of work on his face at this point.  I love for the face of all my little Dwarves to be the focal point of the mini.  I worried that the sword may draw too much away form the face.

Here are the quick first few steps done on his face.


And the finished face shown below.  I took the picture so as to ensure you all saw how grumpy and mean this old dwarf is!  The lesson of the day:

DONT MESS WITH MAGNUS!


I have yet to finish this guy.  When I finish him I will be sure to throw up a pic so you all can tell me what you think.

Thanks for Watching!!

-Grim

Tuesday, November 20, 2012

The Fast Five! Day 2

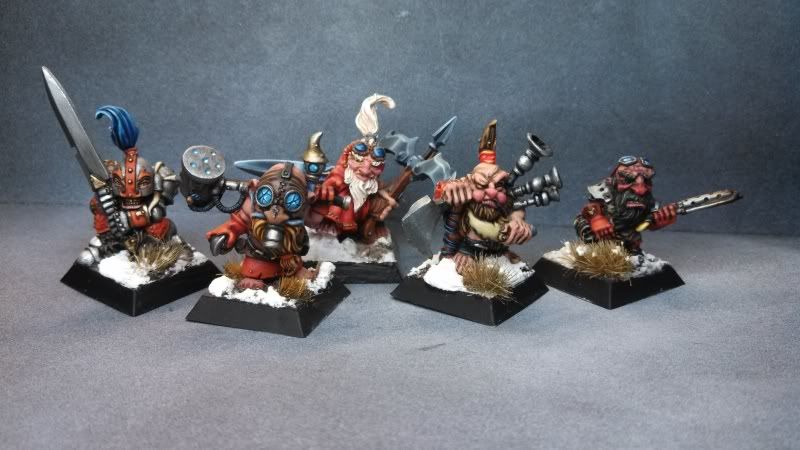
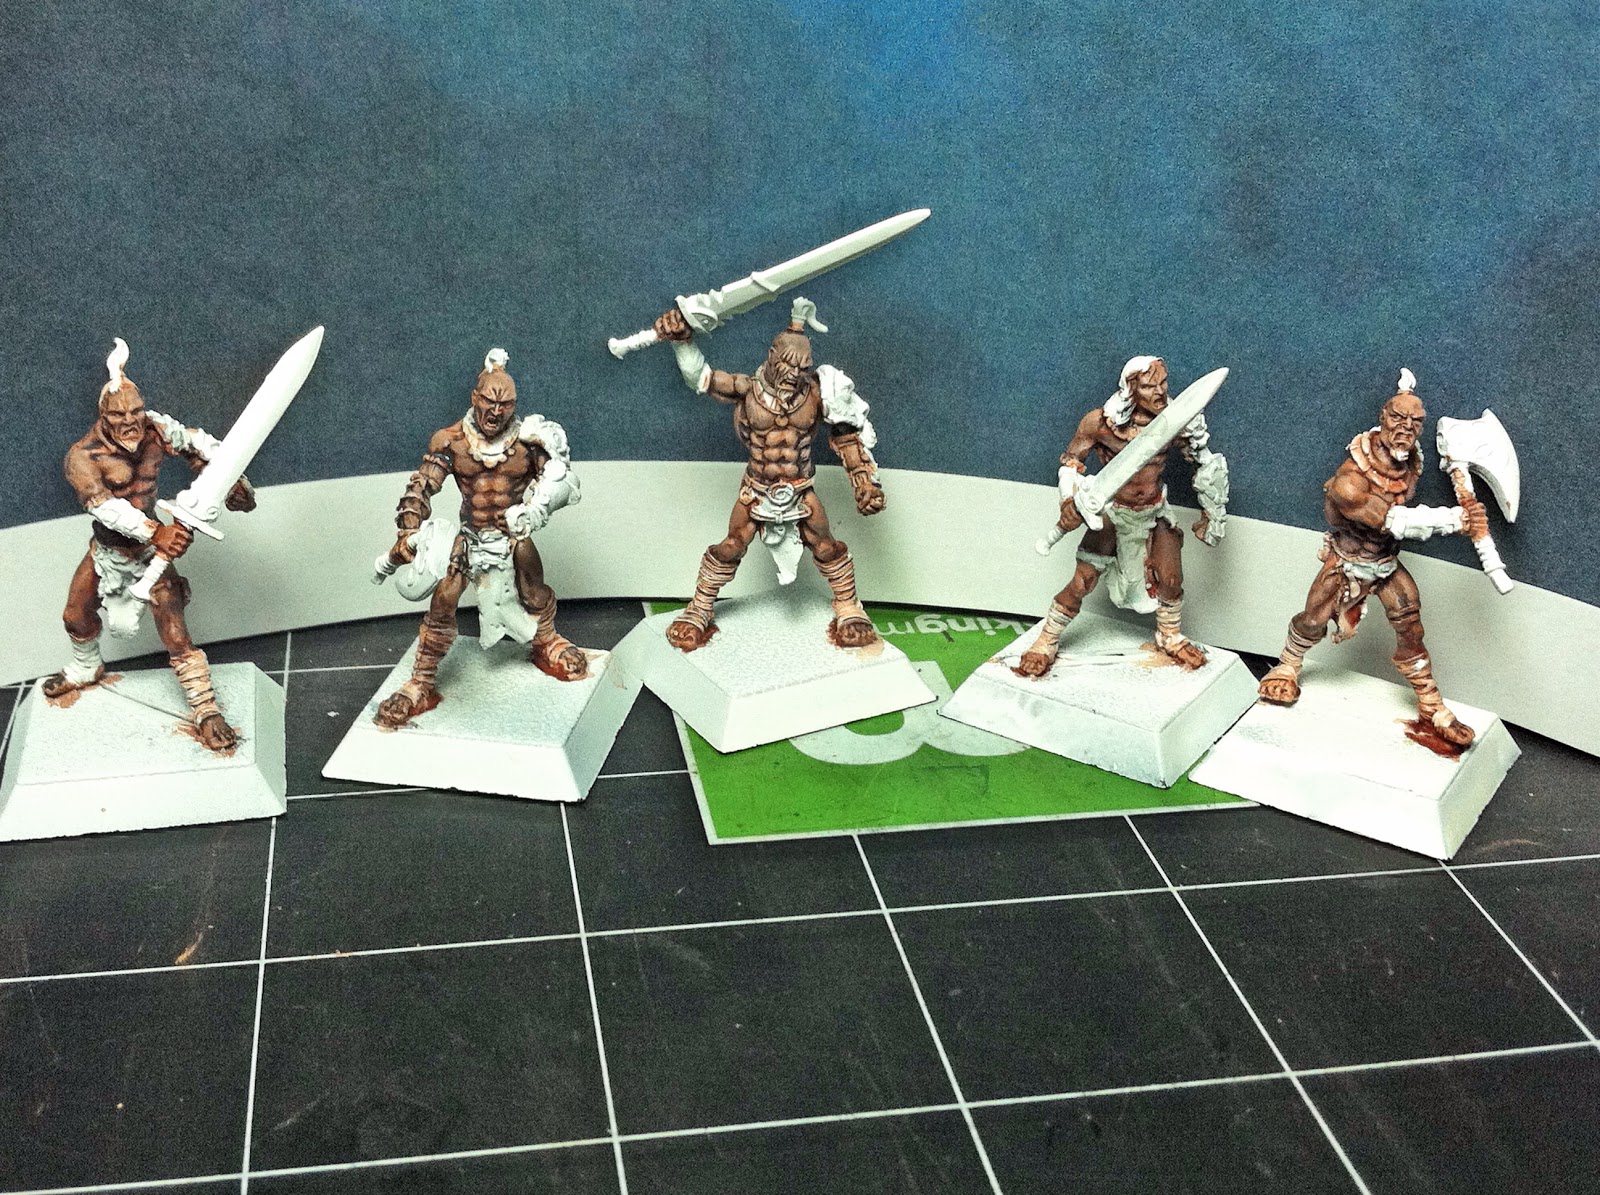
Alright Day one I was able to pump out a really big chunk of these dudes.  The fact that they are 85% flesh helps with that tremendously!

The next few steps aren't quite as detailed as my Five Step Flesh.  But I will walk you through a few of the recipes I used as I finished up... uhhh... Yeah, I finished them :P
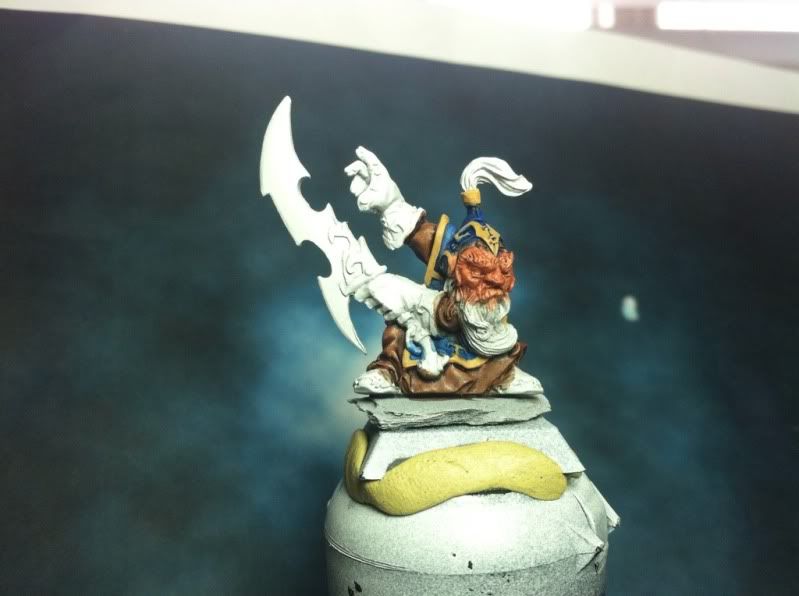
Armor

So with the armor I started with a VMC Flat read, and laid down a heavy wash of Citadel Badab Black wash.

This gives a really dark base point to start with.  Really allowing me to get nice shading on the armor.


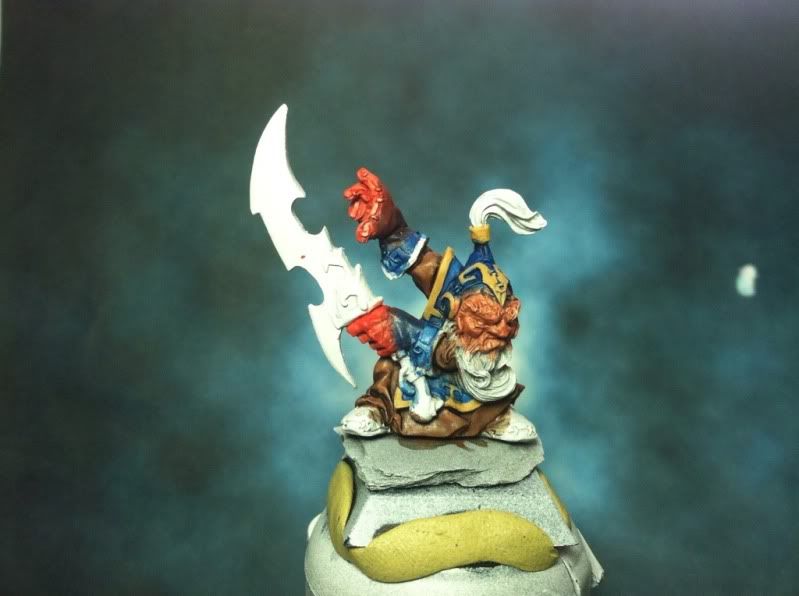
Next I highlighted the armor with VMC Vermillion. Really trying to hit the higher flatter portions of the armor, being sure to leave a nice dark shadow showing.


I then added some Rackham Lahn Yellow to the VMC Vermillion... not sure on the ratio's... just got a brush full of the yellow and mixed it into the red on my pallet, until I got a nice reddish orange color... kinda like the color of trout meat, or salmon... then I added that layer of highlight to the armor.


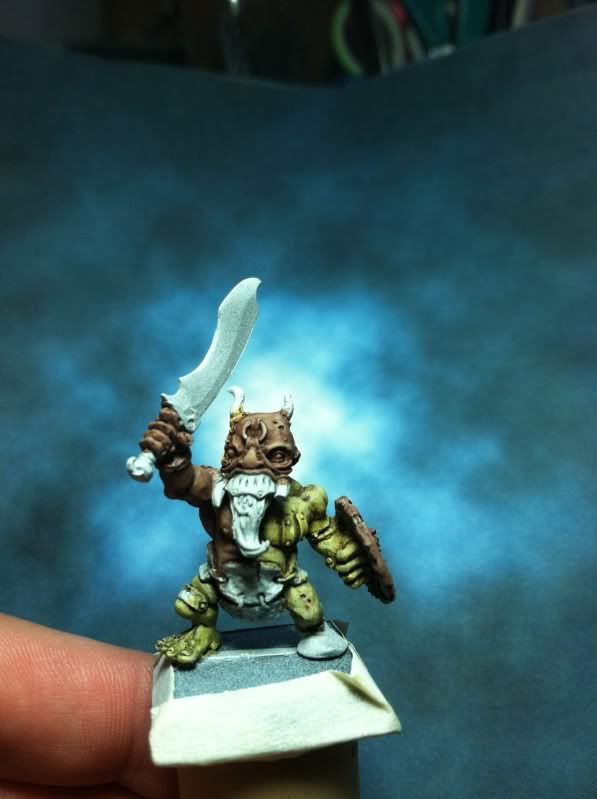
At this point I start hitting the metallics... VMC Gunmetal for all the silver and then VMC Old Gold for the gold portions.  (Ill note that when ever painting metallics over a white base coat I will always lay down a dark grey or black base coat for anything I paint silver, and a yellow or brown basecoat for anything I paint gold).  Also in this pic I have used P3 Menoth White on all of the wrappings, and washed them with a heavy Citadel Devlan Mud wash.


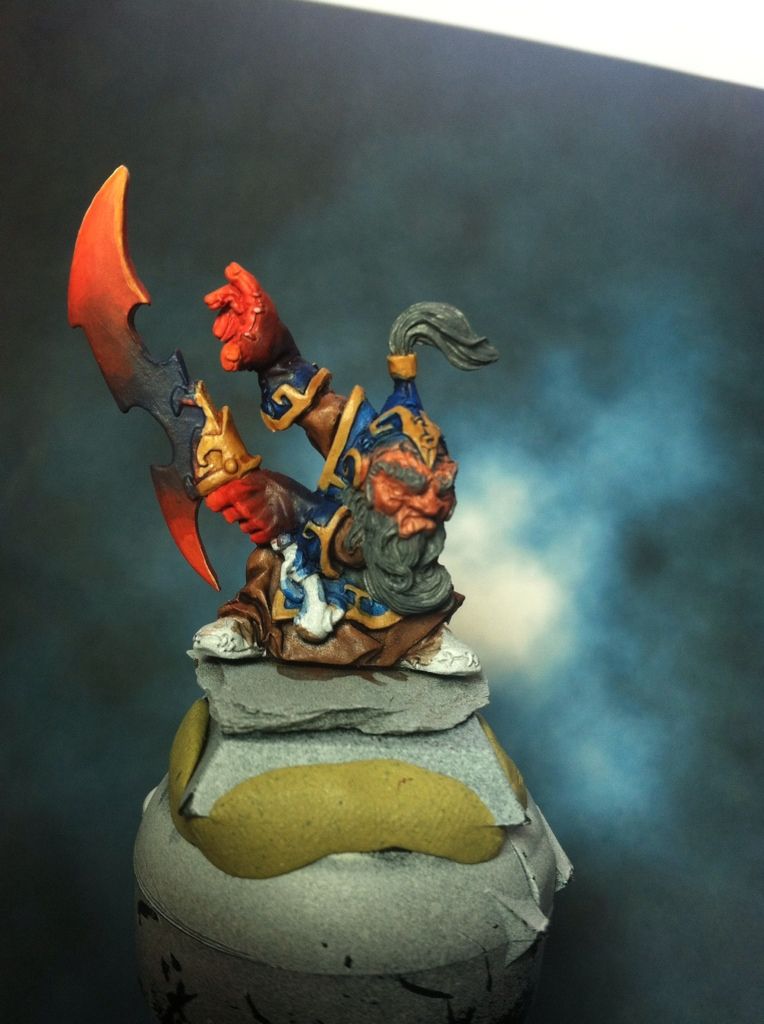
After getting the metallic base coats taken care of I hit all of the silvers with a Citadel Badab Black Wash.  Then I hit all of the gold with a Citadel Gryphonne Sepia wash.


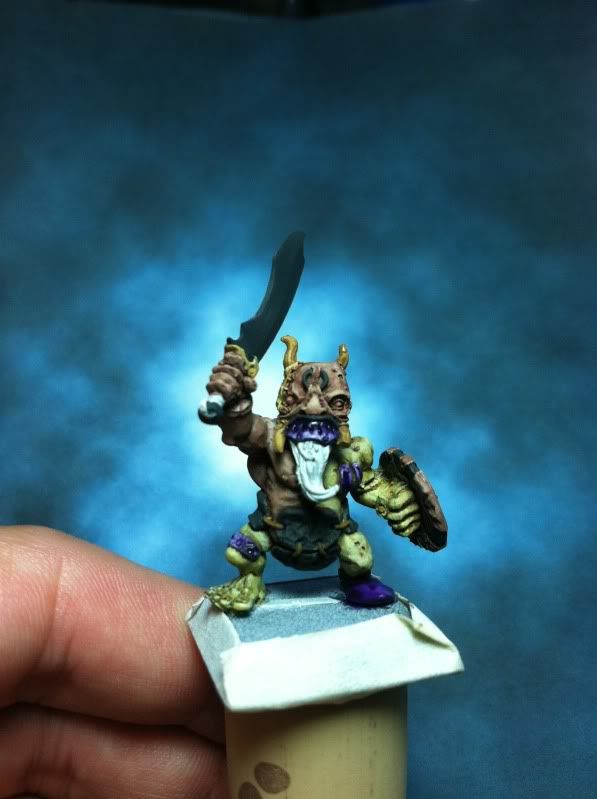
The next step I hit some of the smaller details.  All of the leathers were hit with a Citadel Foundation Calthan Brown basecoat, followed by a Citadel Devlan Mud Wash. The stone portions were hit with a Citadel Astronomicon Grey base coat followed by a wash created by heavily diluting Delta Ceramcoat Black paint.  The loin cloths were hit with varying shades of Greys, blue greys, and green greys.  All of them had a base of Citadel Foundation Astronomicon grey, the blue greys had Citadel Fenris Blue mixed in, the Green greys added VMC US Olive Drab.  They were all washed with a Citadel Badab Black at this point as well.  Then we came to the war paint... I looked at a bunch of images Pict Warriors, Native Americans, and a bit of Braveheart to boot.  I grabbed some Citadel Hawk Turquoise and began slapping on the war paint designs.  I also hit some of the stone work with the Hawk Turquoise as well.


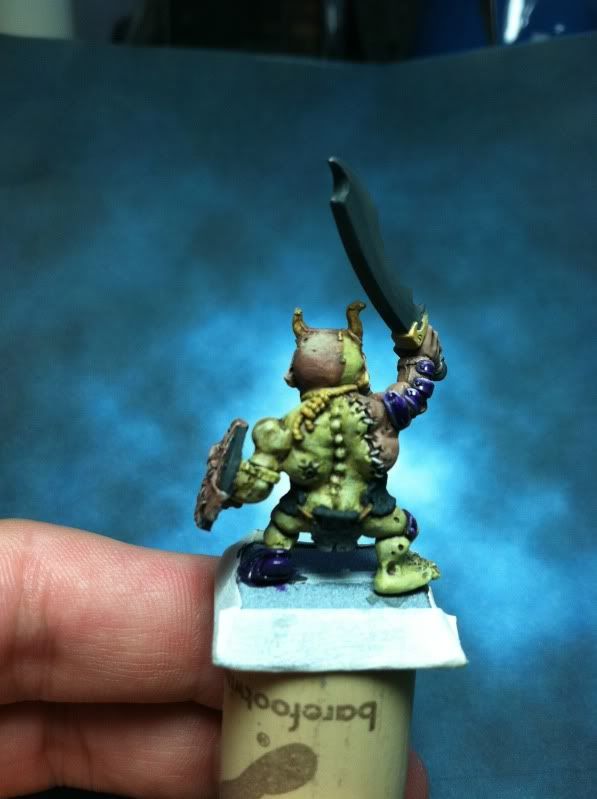
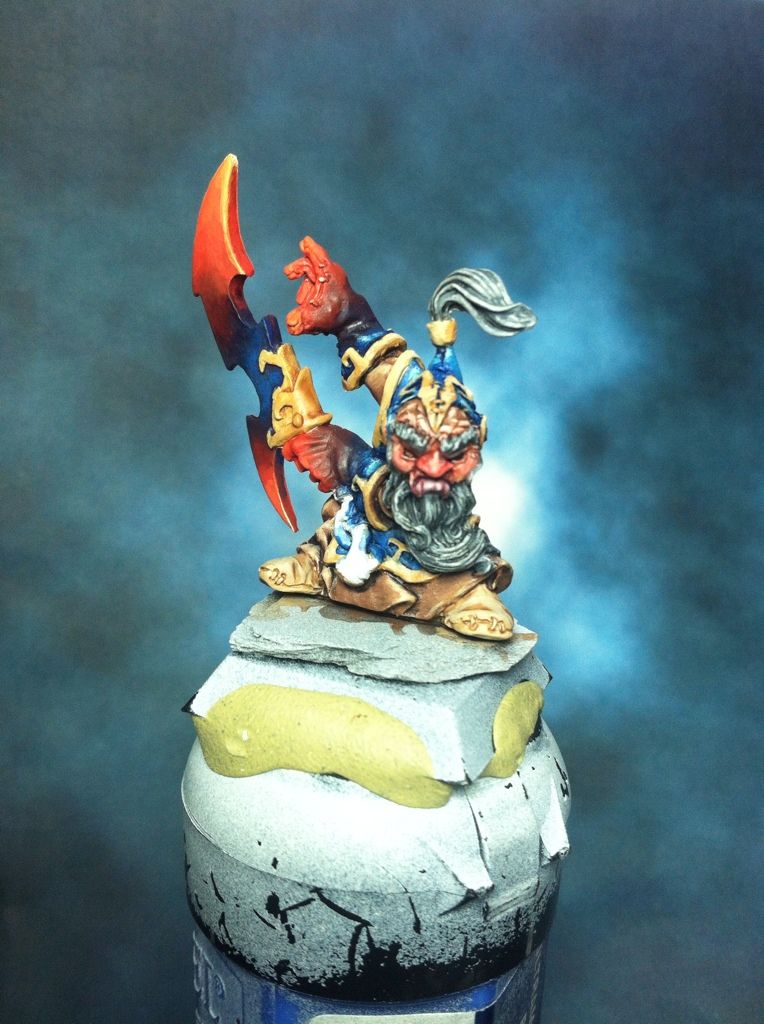
At this stage I am nearly finished with the crew.  Here I have added highlights to the Warpaint, by adding a small amount of Andrea White Color Series number 4 to the Hawk Turquoise.  I highlighted the stone, and the loin clothes by going back with the corresponding basecoat.  I also added the hair at this stage, I used Rackham Black with an Astronomicon grey highlight followed by a Badab black wash to do the black hair.  The reddish hair was Reaper Master Series Red Brown, followed by a Citadel Ogryn Flesh wash.

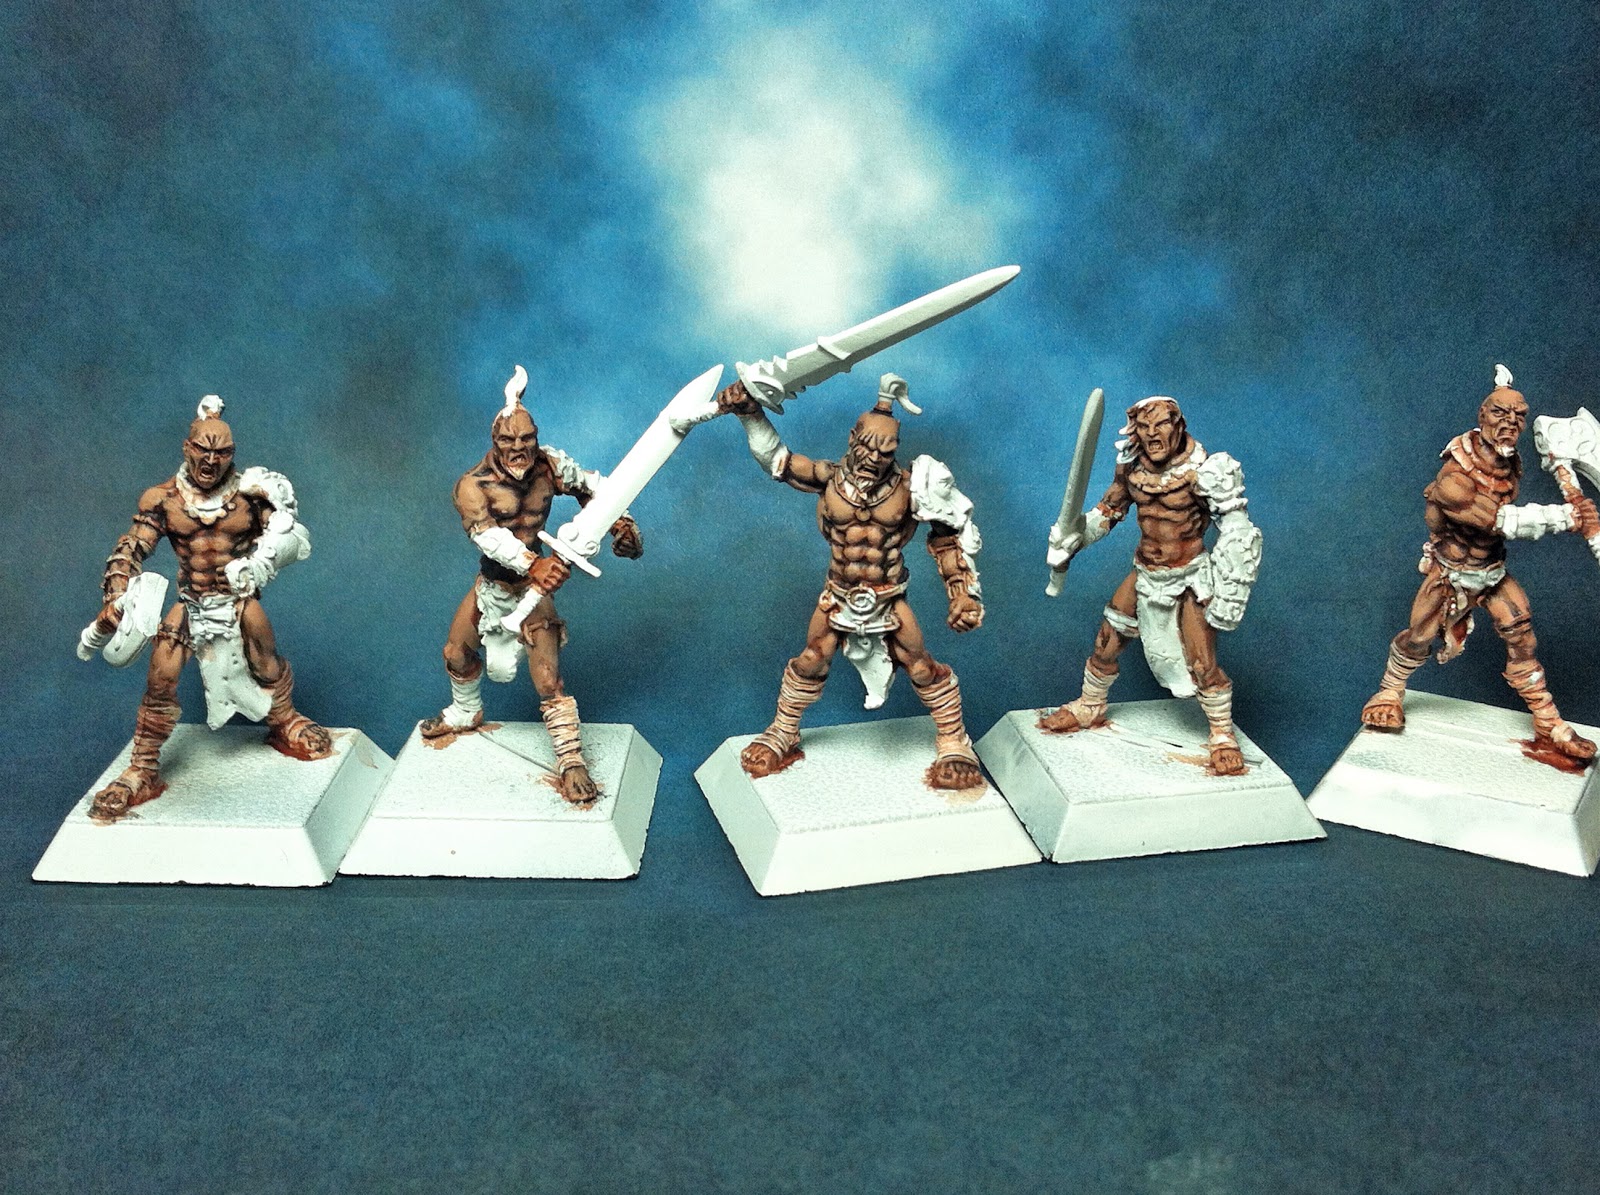
I then began basing, Elmers White glue was slathered onto the bases and the figures were dipped into a bucket of sand.  After allowing them to dry for 4 hours I grabbed some MIG Track Brown Pigment and began caking the base and the feet and the loin cloths of these guys.  It was very messy.  After applying the pigment I sprayed each figure with a Krylon Matte Finish, to lock the pigment in place and give some protection to the paint job.  Finishing touches were to paint the base edges with Rackham Black, and add an Army Painter Battlefields Wilderness Tuft to the base.

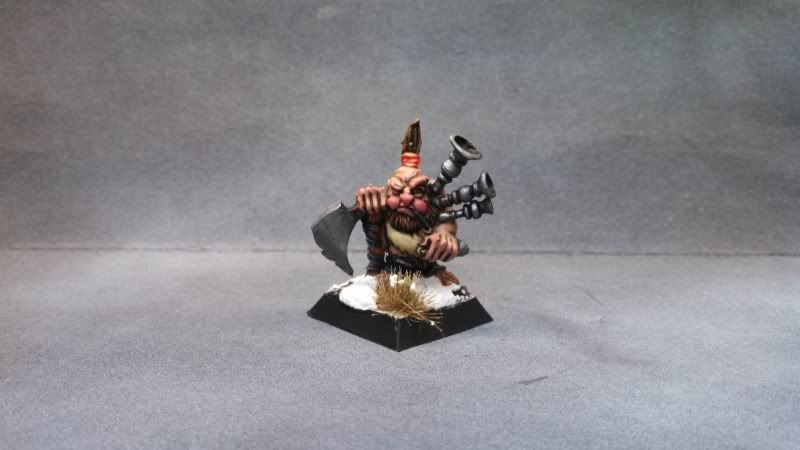
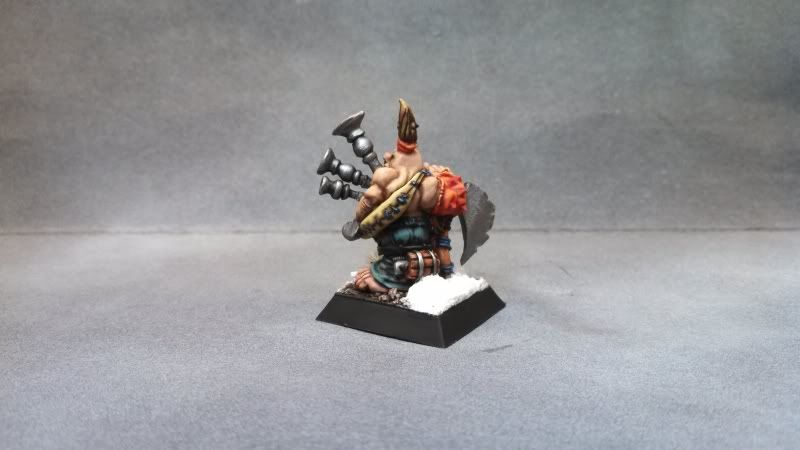
And here you are, a few shots of the finished project.


I hope this write up was cohesive and understandable.  These two posts are kind of a first for me as far as really trying to explain step by step how my brain works as I paint.  Please let me know what you think.  If you like this, then I would be willing to do other similar types of tutorials.  If it is not understandable.. PLEASE LET ME KNOW.  Im really lookin for some good critiques on this.  I'd like to be able to produce helpful tutorials, so feedback is very much wanted.

Five figs in five.....errrrr two days!  Completely possible, I had my doubts, but with some really killer sculpts and a plan of attack you could be staring at a fully painted unit in just a few short days.

Thanks for watching!!

-Grim

Monday, November 19, 2012

The Fast Five! Day 1

So, my buddy over on Scotty'sworkshop.blogspot.com is currently doing a series of posts about painting up 5 Dwarven Miners in 5 days.  I loved the idea.  So much so that I grabbed 5 of my Rackham Warriors of Avaggdu (who count as Marauders of Chaos) and decided I'd try something similar.
Granted I thought trying to finish FIVE figs in five days was going to be near impossible... especially for me. :)  Anyhow I decided to give it a go.

Day 1


First things first I grabbed my figs... Luckily they were all primed... albeit not very well... but primed none the less.  (As you can see I laid a base coat down on one of these guys months ago... never got around to finishing him up though)
I started out with a thing I like to call "Five Step Flesh"


 "Five Step Flesh"


Step 1: Begin with a Citadel Foundation Tallarn Flesh base coat. (My favorite flesh base... sadly they don't make it anymore... anyone know what the new equivalent is... throw me a hint in the comments :) )


Step 2: Citadal Ogryn Flesh Wash.  Heavily apply the wash allover the flesh of the figure. 


Step 3: Highlight with Citadel Foundation Tallarn Flesh.
Here you want to cover most of the flesh, especially any raised portions, muscles etc...


Step 4: Wash with Citadel Wash Asurmen Blue/Tallarn Flesh.  Here I grabbed a blue wash and mixed it with the base coat.  I wanted to add a bit more depth to the flesh and more of a cool tone to the figures.  Again I heavily apply this wash in order for the shadows to really darken.


Final Step 5: I come back and highlight again with Tallarn flesh.  And there you have it a simple 5 step flesh recipe that will produce a pretty nice result.  Perfect for making that unit of Marauders or Doomreavers really pop! 


Stay tuned for the next installment... (I'll give you a hint... I was really motivated to finish these guys and well... Day 2 may be the final installment :) )
Any questions, comments, critiques, anything, please feel free to drop me a line in the comments.
Thanks for Watching!!

-Grim

Thursday, October 25, 2012

Thursday WIPs

Alright, it's been a rough few weeks for me.  Fortunately after a couple of exams I am free again this wonderful Thursday to throw up some of what I have been working on.

These are the two models on my painting desk receiving my painting love.  The troll is part of the fully painted challenge thrown up here by Happy Panda... think once I finish this guy I have 25 pts fully painted!  Yes!!

The big guy is an Extreme Torch conversion I am painting up for a buddy.


I also decided to branch out from the norm and do a little bit of converting.  Here we have a gnarly Dwarven Gryphon rider... This guy may eventually end up as part of my all Rackham Kragmarr Dwarf army from Warlord... Until then... it's just a cool lookin' Dwarf on a Gryphon :)


For more angles and pics... click read more. :)

Torch:


Impaler (Braveheart style? )


and the Gryphon Rider:


Thanks for watching!!

-Grim

Keep your eyes on the blog for some exciting news!

Thursday, August 30, 2012

Glory to the Herd... Part 3

Alright, had a bit of time to do some more work on this crazy dude.  I have completed the flesh and started on the fur and the hair, slapped a basecoat on his axe haft as well.

With the flesh I started with Rackham Tanned Flesh, I diluted it down with water and some VMC thinner medium. It was diluted almost to wash consistency... just a smidge thicker, this only tinted the model.  I followed up with a GW Gryphonne sepia wash.  I came back and highlighted with some GW Tallarn Flesh mixed with the Rackham Tanned flesh... I really don't know the exact mixture... I just kind of plop a drop or two of each color on my wet pallette then I mix 'em together till I get about what I think I need.  (Sorry for the vagueness here :( )  I applied the highlight mix to the top portions of the muscles.  After this application I washed with a bit of GW Asurmen Blue.  After the Asurmen Blue wash dried I mixed some Rackham Ephren Blue with the highlight mixture, watered it down a bit and highlighted again with this mixture.  I then washed again with GW Gryphonne sepia.  After which I introduced some Rackham Red into the initial highlight mix.  ( A tangent here, I use a drop of this Rackham Red in every flesh tone I create in order to get the redish tint to the the faces of all of my models... very useful pot that one :) ) I applied the redish mix to the cheekbones the nose and mouth area of the figure.  Followed up with a thinned down wash of Rackham Ephren Blue, GW Tallarn Flesh, and Rackham Red, essentially a purple wash.  After which I highlighted again with the tallarn flesh mixture and a little bit of Andrea Color White Paint set pot number 2.
I really hope you understand what is going on here... I may have to do a step by step tutorial of this sometime if there is enough interest.

Here are the pics:


Thanks for watching and stay tuned for more!!

-Grim