As a group we have decided that we were going to jump into and start playing the new IKRPG. Our lovely Happy Panda has issued a challenge to the members of the GG.
I gladly accept your challenge sir! En Garde!!
I started with character creation.
In the new IKRPG the first step to character creation is to choose your race. My choice: Dwarf! (anyone suprised by my choice?) Step Two is to choose an archetype: I picked MIGHTY... I mean he's a Dwarf for crying out loud, didn't think there was another choice. :)
Next you choose your careers: Decided on a Military Officer/Bounty Hunter.
Then you name your character and start picking up equipment and the like:
Name- Grim Ulthas
Tailored Plate armor
Mace
Warhammer
Knuckledusters

So with the character creation out of the way I went about picturing in my head how I wanted my character to look on the table top. I began by scribbling out some concept art:
The Ulthas brothers are ex-Rhulic military that have fled to North Eastern Khador to start up a Mechanik's shop.
As they are located in the cold north, I figured it only fitting to make my dwarf look a tid bit like a Rooskie.
So here is my concept.

Now on to figure selection: As a military officer I thought that the best base for a Dwarven military officer would have to be the new General Ossrum fig. I picked him up and began looking for options to match my characters load out.
So starting with Ossrums body I grabbed the right arm off of my recently acquired Gorten Grundback fig... (going to be ordering another right arm from the PP bits order to replace it :) ) clipped the head off his axe and added a mace head, filed his warcaster back pack down to look like a normal back pack and clipped off his pipe... end result:
I really wasn't sure how I felt about the mace. I bounced the idea off of my good buddy and blog contributor Scotty. I felt the mace looked a bit too much like a stick grenade. He thought if fit the IK pretty well, but also agreed it had some stick grenade feel to it as well. So after a bit of deliberation I decided to switch it up and this was the result:
I also forgot to note that I have added a few bits and pieces to the Ossrum fig as well. Three pouches on his back, and two rolled up scrolls.
As a Military officer you start with Battle Plan: Call to Action and have access to several more Battle Plan abilities. I figured to represent these Battle Plans I would add maps and intel-type scrolls to my figure.
 |
| Step 1 |
So with the bits all attached and the figure nearing completion there was only one thing left to do... Yup you guessed it... Give him a right Dwarf-worthy beard. And so it began, my first stop in the beard building process:
 |
| Step 2 |
|
I then thought to my self that maybe this beard was a bit to rough... might be hard to paint... So I moved on to step number 2:
 |
| Step 3 |
|
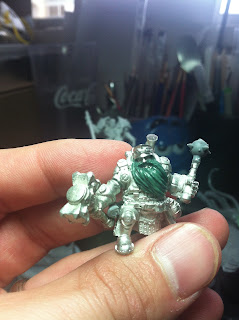
I decided to run this by Scotty as well... his thoughts were that it may have looked a little bit better a scruffy and unkempt... then he threw in a bit of a challenge to test my Green Stuffing abilities... told me to throw a ring of some sort on his beard to break up all the scruffy beardliness. So I moved to step 3:
I did a bit more tweaking here and there... until the green stuff was essentially no longer workable. And ended up with this as a final product:
Well thats it for the conversion part! Next step: Basing and Painting!
Thanks for Watching!!
-Grim


